
Here are some simple tips to help you save time and possibly even money on translation. It’s not just about translation though, these top tips can be could considered best practice whenever you’re writing in Word.
When it comes to preparing a document for your company – be it an important contract or an exciting marketing piece – you could be forgiven for thinking that the words are all that matter. For a translator, however, there are other factors that come into play – most importantly, the layout.
For a translator, it can make quite a difference to the translation if that set of words is a title or a command; if words are dotted around the page, is the translator to understand them as a ‘unit’ or as individual words which could yield an entirely different result if they are translated literally?
For customers, too, the benefits of well-formatted documentation are clear. The use of translation memory (TM) software relies on finding similar or identical matches. If the document is laid out in an inconsistent manner, the TM yield may be less than expected, meaning that customers cannot benefit fully from all that TM can offer.
Here are my top tips for improving your document:
Spellcheck, spellcheck, spellcheck
This may seem like a really simplistic first point to make, but it’s amazing how many people entirely forget to do this, even though they may have spent hours working very hard on producing an otherwise exceptional text.
By simply pressing F7 on your keyboard, you can check for any silly oversights that could potentially cause confusion for the translator, and potentially require reprinting costs for the original text, if the errors are caught too late.
Switch on the “Show/Hide” button
This little button may have entirely escaped your notice, but it can be a life-saver for well-formatted documentation. You will find it on the Home ribbon in Word, in the Paragraph group:
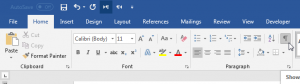
It will show little markers for each of the formatting characters in the document – so spaces will appear as a little dot, so you can see at a glance if you’ve put a double space in between words. It will also show you if you have inadvertently broken a line in two which should actually be one sentence.
It can make the page look rather “busy” when you’re not used to it, but you will soon appreciate the benefits.
Make use of automatic tables of contents
Using the formatting styles on the Home ribbon can be a life-saver. For translators, there isn’t much that fills them with dread quite like fixing a manually created table of contents – languages normally vary in length, sometimes quite dramatically. So chapter 4 in the original document may have been on page 6, but after translation it could be all the way down on page 8 because the translated language is so much longer!
It then will take an age to correct this at the end. But using the different Styles options on the Home ribbon will make this very simple.

Simply apply a Heading style to your chapter title. Word will recognise this and will pick it up automatically when you create a table of contents using the Table of Contents function on the References ribbon.
The Update feature for the table of contents will kill two birds with one stone: firstly, if you ever update your document and add extra chapters, you only have to press Update to rearrange the list and have a perfect table of contents; secondly, for the translation, it will take care of any changes to page numbers, without having to laboriously check to see which page each and every chapter now appears on.
OK, so three very simple things that will make a big difference to your Word document, and will make life much easier for your translation agency (I know, it’s all about us us us!).
If you have any questions about formatting a Word document for translation, let us know at email hidden; JavaScript is required